Defining Search Projects
The first step to use the powerful search features of ApSIC Xbench is to define the reference material for your project. To do so, add the relevant files and directories into your project by choosing Project->Properties or pressing F2. The Project Properties dialog appears as illustrated below.
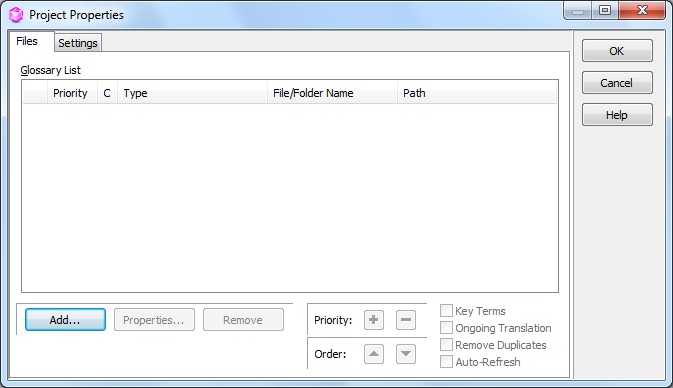
Click the Add button to add files to your project.
Select the type of file that you will be adding to the ApSIC Xbench project:
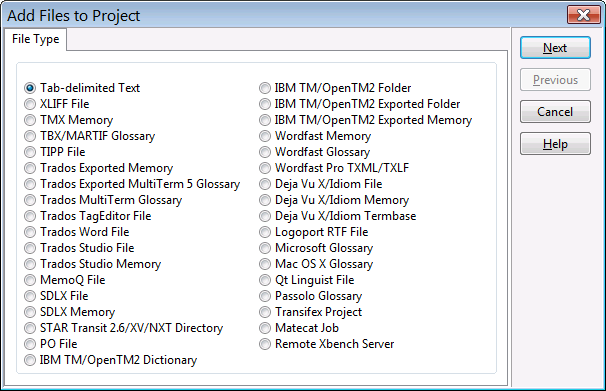
ApSIC Xbench supports the following file types:
- Tab-delimited Text File (*.txt, *.tsv, *.utx). A file where every line consists of a number of fields delimited with the tab character. The first and the second fields of an entry are assumed to be the source and the target texts respectively. The additional fields are assumed to be descriptive and there can be any number of them. Tab-delimited UTX files are also supported with this format.
- XLIFF File (*.xlf, *.xlif, *.xliff, *xlz, *.mxliff, *.mqxlz). A file compliant with the XLIFF specification.
- TMX Memory (*.tmx). A file compliant with the TMX specification. Most translation tools are capable of generating TMX memories of varying compliance levels.
- TBX/MARTIF Glossary (*.xml, *.tbx, *.mtf). A file compliant with the TBX or the MARTIF specification.
- TIPP File (*.tipp). A file compliant with the TIPP specification.
- Trados Exported Memory (*.txt). A Trados memory in .txt format as exported from Trados.
- Trados Exported MultiTerm 5 Glossary (*.txt). A MultiTerm glossary exported into a .txt file where each entry is delimited with a line containing two asterisks (**).
- Trados MultiTerm Glossary (*.xml, *.sdltb, *.mdb). A MultiTerm glossary exported in XML, SDLTB, or MDB format.
- Trados TagEditor File (*.ttx). A Trados .ttx file.
- Trados Word File (*.doc, *.rtf). A Trados .doc or .rtf file with bilingual segments.
- Trados Studio File (*.sdlxliff, *.sdlproj). A Trados Studio .sdlxliff or .sdlproj file. When a Trados Studio project file (*.sdlproj) is specified, ApSIC Xbench opens the .sdlxilff files pointed by the project file for the first language pair found in the project file.
- Trados Studio Memory (*.sdltm). A Trados Studio Translation Memory in .sdltm format.
- memoQ File. A memoQ XLIFF file with .mqxlz or .mqxliff extension, a memoQ hand-off file (.mqout), a memoQ hand-back file (.mqback), or a memoQ termbase file (*.csv).
- SDLX File (*.itd). An SDLX .itd file. Note: This option requires that SDLX is installed on the machine.
- SDLX Memory (*.mdb). An individual SDLX .mdb file containing a translation memory.
- STAR Transit 2.6/XV/NXT Directory. A directory that contains Transit language pairs.
- PO File. A bilingual .po file, normally generated with gettext.
- IBM TM/OpenTM2 Dictionary (*.sgm). An IBM TranslationManager or OpenTM2 dictionary in SGML format. This file has the .sgm extension.
- IBM TM/OpenTM2 Folder. An IBM TranslationManager or OpenTM2 folder installed on your system. This format can be defined as ongoing translation to clearly distinguish the new and the old translation and also to display the untranslated segments to make better decisions for new terminology.
- IBM TM/OpenTM2 Exported Folder (*.fxp). An IBM TranslationManager or OpenTM2 folder exported in .fxp format.
- IBM TM/OpenTM2 Exported Memory (*.exp). An IBM TranslationManager or OpenTM2 memory exported in .exp format.
- Wordfast Memory (*.txt). A Wordfast memory, with the .txt extension.
- Wordfast Glossary (*.txt). A Wordfast glossary, with the .txt extension.
- Wordfast Pro TXML (*.txml, *.txlf). A Wordfast Pro bilingual file, with the *.txml or *.txlf extension.
- Déjà Vu X/Idiom File (*.wsprj, *.dvprj, *.dvsat, *.dvpng). A Déjà Vu or Idiom database of project translation files, with extensions .dvprj, .dvsat, .dvpng, or .wsprj.
- Déjà Vu X/Idiom Memory (*.wstm, *.dvmdb). A Déjà Vu or Idiom translation memory, with extensions .dvmdb or .wstm.
- Déjà Vu X/Idiom Termbase (*.wstd, *.dvtdb). A Déjà Vu or Idiom termbase, with extensions .dvtdb or .wstd.
- Logoport RTF (*.rtf). An individual Logoport .rtf file or a directory containing Logoport .rtf files.
- Microsoft Glossary (*.csv). A Microsoft software glossary, made publicly available by Microsoft via MSDN and containing all the strings of a Microsoft software application.
- Mac OS X Glossary (*.ad, *.lg). A file in Apple’s XML format for software, freely downloadable from the Internet.
- Qt Linguist Files (*.ts). A file in the translation format for the Qt framework.
- Passolo Glossaries (*.glo). A Passolo glossary, with extension *.glo.
- Transifex Project. An online Transifex project.
- Matecat Job. An online Matecat job, both from www.matecat.com or self-hosted.
- Google Translator Toolkit File (*.gtt). A document downloaded from
Google Translator Toolkit (GTT) using the
Xbench Chrome Extension
or the
Xbench Chrome Extension for GTT.
- Remote Xbench Server. A reference to a Remote ApSIC Xbench Server.
After the file type is selected, the File List tab appears where you can add multiple entries of the selected type. Depending on the file type chosen, click on the Add File or Add Folder button to add entries to the list.
From this point, the sequence of displays may differ depending on the selected file type. Follow the instructions corresponding to the specific file type for the exact steps.
| If you are adding a ... | Follow these steps: |
| Tab-delimited text file, XLIFF file, TMX memory, TIPP file, Trados Exported memory, Trados Tag Editor file, Trados Word file, Trados Studio file, Trados Studio memory, memoQ file, SDLX file, SDLX Memory, PO file, IBM TM/OpenTM2 Dictionary, IBM TM/OpenTM2 Exported folder, IBM TM/OpenTM2 Exported memory, Wordfast memory, Wordfast glossary, Wordfast Pro TXML/TXLF, Microsoft glossary, Mac OS X glossary, Déjà Vu X/Idiom file, Déjà Vu/Idiom memory, Déjà Vu/Idiom termbase, Logoport RTF file, Qt Linguist file, Passolo glossary |
|
| STAR Transit directory |
|
| Trados exported MultiTerm 5 glossary, Trados MultiTerm, or TBX/MARTIF |
|
| Transifex Project |
|
| Matecat Job |
|
| Remote Xbench Server |
|
Once you are returned to the Project Properties window, you can add other files or directories following the steps described above.
When you are done, click OK on the Project Properties window to return to ApSIC Xbench main window. ApSIC Xbench will load the glossaries into the work environment.
At this time, on the Project menu, click Save as to save the newly created project in your directory with other ApSIC Xbench projects. It is recommended to save project files with meaningful names for later reuse.
The next time ApSIC Xbench is started, it will automatically load the previous project unless this feature is disabled in Tools->Settings- >Miscellaneous.