Working with Settings
On the Tools menu, click Settings to open the Settings dialog as shown in the illustration below.
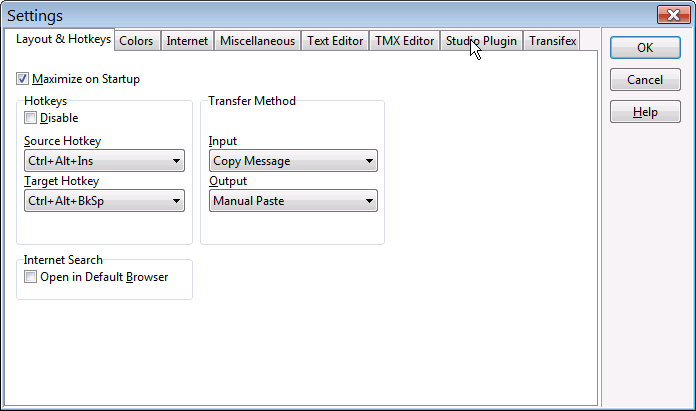
In this dialog, you can set ApSIC Xbench to always start in maximized mode (recommended) and also change the default hotkeys that are available system-wide.
Changing the default hotkeys should be necessary only as a workaround to avoid clashing with any other application using the same keys.
The fields in this dialog are:
Maximize on Startup. If you check this box, ApSIC Xbench will appear maximized when it is launched. It is recommended to check this box, as the maximized mode is the one that provides the maximum amount of information at the same time.
The following settings belong to the Hotkeys group.
- Disable. This check box lets you disable the system-wide key combinations featured by ApSIC Xbench. It is recommended to leave this box unchecked as one of the most valuable features of ApSIC Xbench is the capability to search directly from any application.
- Source Hotkey. This is the hotkey defined to trigger a search of the clipboard contents in the source text. By default it is Ctrl+Alt+Insert.
- Target Hotkey. This is the hotkey defined to trigger a reverse search of the clipboard contents in the target text. By default it is Ctrl+Alt+Backspace.
It is recommended not to change these hotkey settings unless they clash with the values in another application.
Internet Search / Open in default browser. When checked, it opens your Internet searches in your default browser, instead of opening it in ApSIC Xbench embedded browser.
Transfer Method. ApSIC Xbench uses the clipboard as a transfer mechanism between the different Windows applications and ApSIC Xbench. Normally the most convenient and consistent transfer method is to leave the default options Manual Copy and Manual Paste, but in some scenarios (for example with applications that do not feature standard copy and paste keystrokes), you may have to change these settings to get the most out of ApSIC Xbench.
The options available as a transfer method for Input are:
- Copy Message. When you press Ctrl+Alt+Insert, ApSIC Xbench sends a COPY message to the application to copy the selected text into the clipboard and then performs a search using the contents of the clipboard. A limited number of applications support this technique, but it has the advantage of avoiding the need for copying manually the text into the clipboard (normally with Ctrl+Insert).
- Manual Copy. In this mode, ApSIC Xbench expects that the user has already copied the text to search in the clipboard. It sounds more tedious, but it has the advantage that many applications support the Ctrl+Insert key combination for copying text, which means that you feel a more consistent behavior across applications. On the downside, if the editing application has a slow response time, you may go too fast with the combination Ctrl+Insert, Ctrl+Alt+Insert for the application.
- Keyboard Emulation (Ctrl+Insert). In this mode, ApSIC Xbench sends the Ctrl+Insert keystroke to the editing application and then performs the search. This way the user needs not to type Ctrl+Insert manually prior to the search. Some applications may not support this input method.
- Keyboard Emulation (Ctrl+C). In this mode, ApSIC Xbench sends the Ctrl+C keystroke to the editing application and then performs the search. This way the user needs not to type Ctrl+C manually prior to the search. Some applications may not support this input method.
The options available as a transfer method for Output are:
- Paste Message. When your press Enter to select a translation, ApSIC Xbench sends a PASTE message to the application to paste the translation. A limited number of applications support this technique, but it has the advantage of avoiding the need for pasting manually the text into the clipboard (normally with Shift+Insert).
- Manual Paste. In this mode, ApSIC Xbench copies the target text of the selected entry into the clipboard if you press Enter to select a translation. The user is expected to press Shift+Insert (or the corresponding key combination for pasting text in the application) to complete the copy and paste operation. This is the default and recommended mode for consistency reasons across applications.
- Keyboard Emulation. In this mode, ApSIC Xbench sends the target text by simulating that it is entering the text to the editing application when you select an entry and press Enter to copy the selection into the clipboard.
- Keyboard Emulation (Ctrl+V). In this mode, ApSIC Xbench sends the target text by simulating the Ctrl+V keystroke to the editing application when you select an entry and press Enter to copy the selection into the clipboard.
Click the Colors tab of this dialog to change the default colors of the main window. The following window appears:
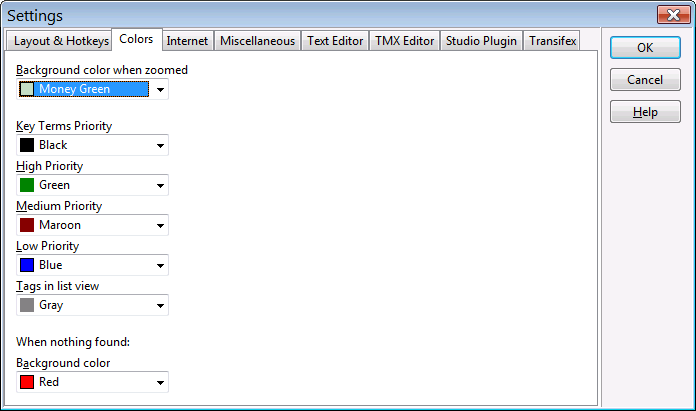
Settings in this tab are the following:
- Background color when zoomed. In ApSIC Xbench there are two modes: overview, with some entries from the priorities shown, and the zoomed mode, where all the entries of a given priority are shown. This is the background color that is used in zoomed mode, as an indicator that you are not in overview mode (the default mode is overview).
- Key Terms priority. This is the color that will be used for entries that belong to the Key Terms priority. A glossary is defined as a Key Terms glossary in Project->Settings.
- High Priority. This is the color that will be used for entries belonging to the high priority.
- Medium Priority. This is the color that will be used for entries belonging to the medium priority.
- Low Priority. This is the color that will be used for entries belonging to the low priority.
- Tags in list view. This is the color that will be used for tags in the search results list.
- Background color when nothing found. This is the background color that appears in the search box when no entry is found.
Click the Internet tab to work with Internet definitions:
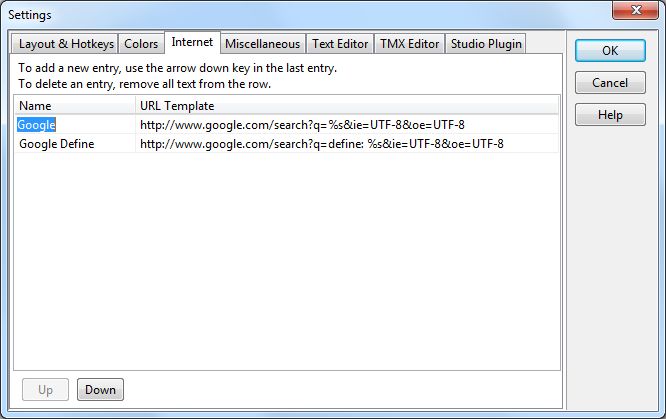
The Internettab lets you define the pattern URLs that you use to perform targeted searches in the Internet, for example in a dictionary. You can have as many entries as you wish, but only the first 10 will have a hotkey assigned, either Alt+n within ApSIC Xbench or with Ctrl+Alt+n (with the numeric keypad in this latter case in Num Lock mode) from any Windows application. n can be a number from 0 to 9, where the 0 corresponds to the 10th entry in the list.
To add a new entry, press the arrow down key in the last entry. To remove an entry, remove all text from the row.
You can use the Up and Down buttons to move an entry up or down in the list.
The up to 10 entries with a key assigned appear in the Internet menu.
You can choose Internet->Capture URL to capture URLs into this list.
The Miscellaneous tab lets you specify various settings that may improve your experience as you get familiar with ApSIC Xbench.
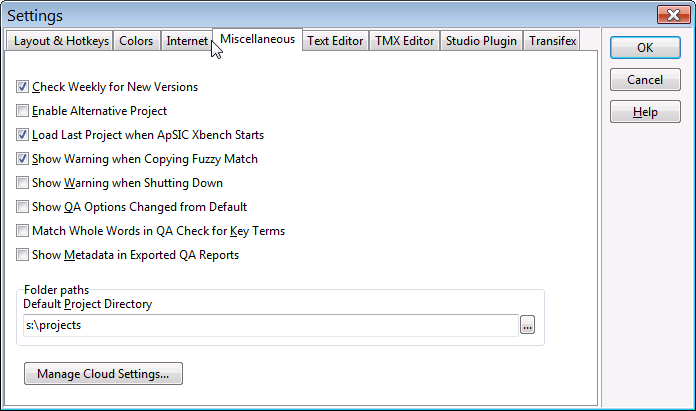
Settings in this tab are the following:
- Check weekly for new versions. If this check box is enabled, ApSIC Xbench will check once a week if there are updates available.
- Enable alternative project. If this check box is checked, ApSIC Xbench keeps in memory the project opened prior to the current one. To switch back and forth among both projects, choose Project->Switch to Alternative Project. To discard the alternative project and recall the memory used by it, choose Projects->Forget Alternative Project.
- Load last project when ApSIC Xbench starts. If this check box is checked, the next time ApSIC Xbench is started, it will load the project that was opened at the time of the last shut down.
- Show warning when copying fuzzy match. If this check box is checked, ApSIC Xbench will issue a warning message if you press Enter to copy the entry currently selected in the search results and such entry does not match exactly the searched term.
- Show warning when shutting down. If this check box is checked, ApSIC Xbench will issue a warning message when you shut it down.
- Show QA options changed from default. If this check box is checked, QA results will include at the top a list of all QA settings that do not have the default value defined by ApSIC.
- Match whole words in QA check for key terms. If this check box is checked, the target term of an entry of a glossary defined as key terms should match as a whole word (please note that the source term is always matched as a whole word).
- Show metadata in exported QA reports. When enabled, ApSIC Xbench will show the segment metadata in the Comments column of the exported QA report.
- Default project directory. This field allows you to specify the default folder for your ApSIC Xbench projects.
- Manage Cloud Settings. This button allows you to set which Xbench settings, such as URLs or colors, should be replicated to the cloud so that they are also available in other computers from which you sign in to your Xbench account.
The Text Editor tab lets you configure command-line arguments for a text editor when using the Edit Segment feature for search or QA results for a glossary in .txt format. This includes Tab-delimited Files, Trados Exported Memories, Wordfast Memories, and Wordfast Glossaries. When properly configured, this allows you to open the file directly at the line from which the segment selected with Edit Segment comes from.
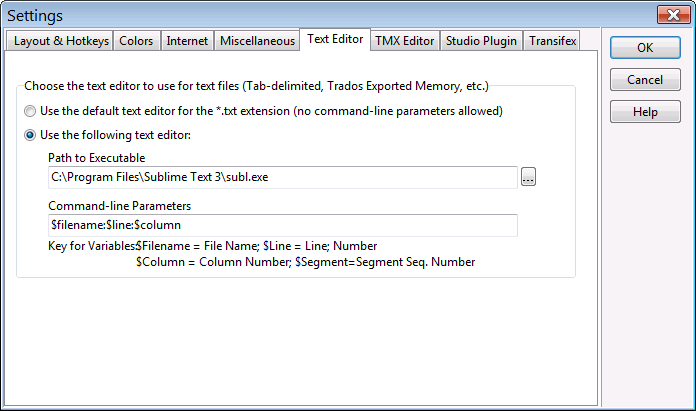
If you choose to define a Text Editor, you need to assign values to the following fields:
- Path to Executable. This is the path to the .exe file for the Text Editor. You can use the button with the ellipsis (…) to navigate to the .exe file.
- Command-line Parameters. This field allows you to construct the command-line that should
be passed to the editor. You can use several variables that will be replaced with values by ApSIC Xbench:
- $Filename: The file name, including its path of the file.
- $Line: The line number of the segment in the text file. This line refers to where the target text is located.
- $Column: The column in the line where the target text is located.
- $Segment: The segment number in the text file.
For example, to configure TextPad 4 for line positioning, you must select there the Text Pad executable and specify the
following in Command-Line Parameters: $filename($line,$column). Similarly, to configure Notepad++, you must select
its executable and specify the following in Command-Line Parameters: $filename -n$line. Other text editors will
require different values for this field. Please check your text editor’s documentation for the suitable values.
The TMX Editor tab lets you configure command-line arguments for a TMX editor when using the Edit Segment feature for search or QA results for a glossary in .tmx format. When properly configured, this allows you to open the file directly at the line from which the segment selected with Edit Segment comes from.
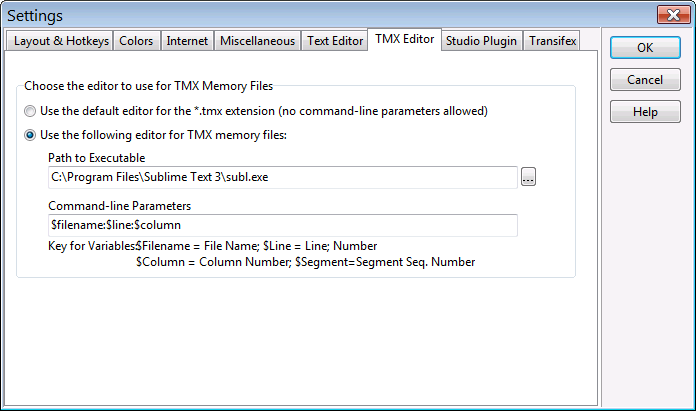
If you choose to define a TMX Editor, you need to assign values to the following fields:
- Path to Executable. This is the path to the .exe file for the TMX editor. You can use the button with the ellipsis (…) to navigate to the .exe file.
- Command-line Parameters. These fields allows you to construct the command-line that
should be passed to the editor. You can use several variables that will be replaced with
values by ApSIC Xbench:
- $Filename: The file name, including its path of the file.
- $Line: The line number of the segment in the TMX file. This line refers to where the target text is located.
- $Column: The column in the line where the target text is located.
- $Segment: The segment number in the TMX file.
For example, to configure OKAPI Olifant for segment positioning, you must select there the Olifant executable
and specify the following in Command-Line Parameters: $Filename row=$Segment col=trg edit=yes. Other TMX
editors might have different values for this field. Please check your TMX editor’s documentation for the
suitable values.
The Studio Plugin tab lets you configure settings that modify the behavior of the ApSIC Xbench Plugin for SDL Trados Studio.
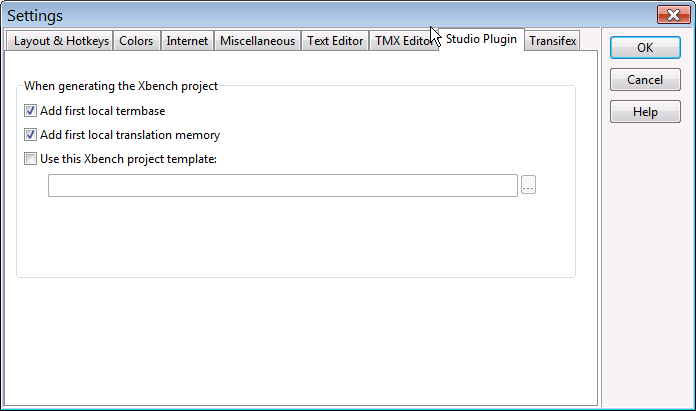
The settings available on this tab are:
- Add first local termbase. When checked, the plugin will add the first local termbase defined for the SDL Trados Studio project to the Xbench QA project created from the plugin. The termbase will be assigned high priority in the Xbench project.
- Add first local translation memory. When checked, the plugin will add the first local translation memory defined for the SDL Trados Studio project to the Xbench QA project created from the plugin. The translation memory will be assigned low priority in the Xbench project.
- Use this Xbench project template. When checked, it will instruct the plugin to add Studio files to the Xbench .xbp project indicated in the field below. Use the ellipsis button (…) to open a Windows Explorer to select the .xbp file.
The Transifex tab lets you configure the Transifex user that will be used to retrieve project information from Transifex and your default target language.
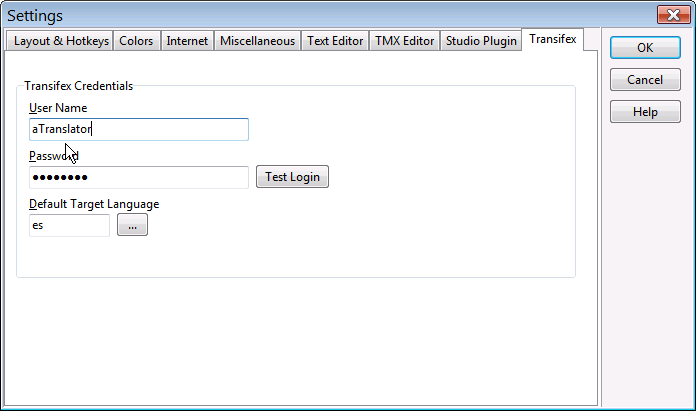
The items available on this tab are:
- User name. The Transifex user name.
- Password. The password of the Transifex user.
- Test Login. Click this button to check if the Transifex credentials are correctly typed.
- Default target language. Type here your default target language in Transifex projects. If you press the ellipsis (…) button, a list of valid target languages will be shown.