Managing Checklists
Checklists are a very useful Quality Assurance (QA) function in ApSIC Xbench. Built on ApSIC Xbench search engine, checklists are a compilation of searches that can be run in batch to identify segments with problems. Typically, you store in checklists common pitfalls, such as use of banned terms or expressions. It is a very good practice to compile client feedback in checklists to make sure that no feedback is forgotten in subsequent deliveries of translations.
In the QA tab of the main window, you will be able to run these checklists against all files defined as ongoing translation in the ApSIC Xbench project.
Since checklists are built on top of ApSIC Xbench search engine, anything that can be searched for in ApSIC Xbench can be added to a checklist. Actually, one useful means of adding a search into the checklist is by searching it first in the Search tab, and then clicking Add Last Search to Checklist in the Search Options pane of the main window.
There are two types of checklists: Project Checklist and Personal Checklist.
The Project Checklist is saved with the ApSIC Xbench project file (.xbp extension) and normally it contains checks that are specific of the project, such as checking if some untranslatable keywords have been accidentally translated.
Personal Checklists are not saved to the ApSIC Xbench project file. Instead they are saved to an ApSIC Xbench checklist file (.xbckl extension). ApSIC Xbench remembers the last set of personal checklists used across projects. You can have any number of personal checklists loaded at any given time. Personal checklists normally contain non- project types of checks, such as a common misspelling that survives the spell checker or a generic language rule that is interesting to check across projects. They are called “personal” because the terms compiled in these lists normally are filled with the errors that a given translator is more prone to do.
Checklists are managed in the Checklist Manager tab. You can open the Checklist Manager tab with the following methods:
- Choose View->Checklist Manager.
- Click the Checklist Manager icon on the tool bar.
The Checklist Manager allows you to work with your Project and Personal Checklists.
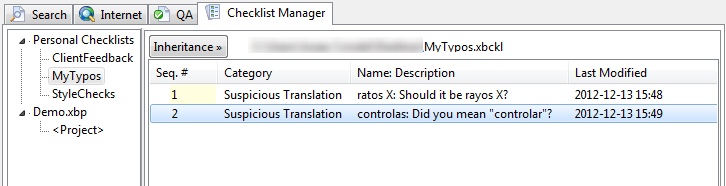
In the Checklist Manager, you can create new Personal Checklists by choosing Checklist->New when the cursor is placed on Personal Checklists group in the navigation tree. You can also add an existing checklist with Checklist->Add. All of the personal checklists listed under Personal Checklists will be run when you click Run Personal Checklists or Check Ongoing Translation on the QA tab.
The <Project> checklist is stored in the ApSIC Xbench project file (.xbp extension), and cannot be removed from the Project Checklists group in the navigation tree. You can add more checklists to the Project Checklists group, which will be run when you click Run Project Checklists or Check Ongoing Translation on the QA tab. The items in these additional project checklists are not saved to the ApSIC Xbench project file itself but they become linked to the project, so next time you open the ApSIC Xbench project file, any checklists linked to it will also appear here.
The entries in the checklist selected on the navigation tree are shown on the body of the window. You can sort by any of the columns. If you wish to disable an individual entry, you can right-click it and choose Disable.
Please note that the disabled state is saved to disk, so next time that you open the same checklist the entry will remain disabled.
You can test the selected checklist item against the loaded project by right-clicking a check list item and choosing Test. This action will run a search with the checklist item settings in the Search tab, so that you can see if the search results returned match the expected behavior.
When you click on a column heading, the list is sorted by that column alphabetically. If you click on the column heading a second time, the list is sorted from bottom to top. If you type a sequence of characters, the current column will be searched for the typed sequence of characters.
Individual checklist entries can be added or edited. Fields available are the same that can be specified in the Search Options pane of the Search tab.
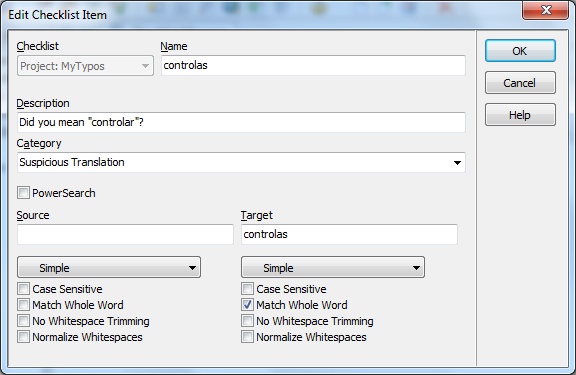
In addition, you can also specify a category for the checklist entry in the Category combo box. You can specify here any category name. If you wish to use a previously defined category name, you can expand the combo box by clicking the arrow button and choose it from the list. If you have created category names, you will be able to run selectively subsets of categories when you run a project or personal checklist from the QA tab using the Run Project Checklists or Run Personal Checklists buttons.
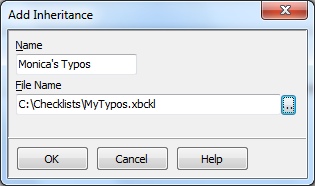
You can also define inheritance relationships between checklists. When a checklist inherits from another one, all entries are inherited. You can inherit from several checklists.
To inherit a checklist, do the following.
- Click the Inheritance button and then right-click on the list of inherited items that appears and choose Add.
Type a name for the inherited checklist and choose the file name that contains it. The name specified here does not need to match the checklist display name.
Add any required checklists following steps 1 and 2. The dialog will show the inherited items with the
 icon. You can override these
inherited items but not edit or delete them.
icon. You can override these
inherited items but not edit or delete them.

Once you set an inheritance relationship, any changes or additions you make in the parent checklist will be inherited.
The Project Checklist is saved automatically when you save the project. If you add entries to the Project Checklist and then shut down ApSIC Xbench, you will be prompted to save the project.
Changes made to all checklists are saved automatically, except for the <Project> checklist that will be saved with the .xbp Xbench project file.
If you wish to make changes to a checklist but not save them to it, you can create a duplicate of a checklist right-clicking on it and choosing Save as.